White Balance
Summary

- The white balance setting dictates how the camera processes the light currently illuminating the subject.
- Different light sources produce light with different color temperatures which affects the resultant image.
- The white balance setting tells your camera the kind of light source so that the camera can adjust, producing more realistic images.
- Most modern cameras have an auto white balance setting that produces a correct image 90% of the time.
- If the image is shot in the raw format, the white balance can be changed in post-processing.
what is white balance and what does it do?
The white balance setting is all about the quality and type of light that the camera captures. Simply put, the camera captures the reflected light from the subject you are photographing and the white balance setting changes how the camera processes the light that it captures. There are 9 white balance settings, all of which are described below. However, to truly understand this topic, we must first understand the light that the camera is capturing. In fact, as photographers, one of the most important skills to learn is understanding and reading the lighting of your subject. With this in mind, this article first dives into some fundamental properties of light that directly relate to taking photos. The article then goes on to explain white balance settings and how to effects the captured image.
Photographers Guide to Light

The first thing to know is that light can be broken up into a visible (light humans can see with the naked eye) and a non-visible spectrum (light humans are unable to see with the naked eye). Since we are photographers, this section will only talk about the visible spectrum (as that is also what the camera captures). As most of us learned in our schooling days, the visible spectrum is made up of 6 primary colors: violet, blue, green, yellow, orange and red. Each of these colors appear at a very specific wavelength and all other colors are a combination of these 6 colors. For example, white is the combination of all these colors while black is the absence of these colors. Photographers usually describe light as either warm or cool where warm colors are from the red / orange side of the spectrum and cool colors are from the green / blue side of the spectrum.

One thing that is worth understanding is why an object appears a specific color, lets say blue. The reason an object appears blue is because all of the different color wavelengths from the lighting source (lets say a pure white light which contains all colors in equal amount) are absorbed except for the wavelength corresponding to the color blue. Therefore, the object is reflecting blue light, thus making it blue.
The above is what happens if the lighting source is pure white. However, not all light is pure white meaning that our blue object may not appear blue if the lighting source does not produce the blue wavelength. This is especially troubling when taking photographs as we want the image of our subject to be colored in the same way as we saw it.
As a result of this color imbalance, we need a way to differentiate between the color cast by different light sources. Thus, light sources are classified by different color temperatures and are measured and in expressed in Kelvin. In fact, most light bulb packages and the light bulbs themselves have the kelvin rating printed on them. The below table shows the kelvin rating of some of the most used light sources and an example light bulb with the kelvin rating circled.


Have you ever taken a photograph and the image's color is nothing like what your eyes saw? (The sky isn't as blue or the rocks aren't as white as you remember?) This is because humans and cameras interpret colors differently. The human eye is able to see all these colors thanks to cells, called cones. These cells are able to adapt and adjust based on the light source and inform your brain what color you are seeing. Your brain is extremely intelligent and can interpret a wide range of lighting sources with different color temperatures. Cameras are similar to the human eye in some regards but they are unable to automatically adjust based on the light source. This is where the white balance setting is used. The white balance setting tells your camera the color of the light source illuminating your subject and enables your camera to remove unrealistic color cast (so objects that are white, appear white).
How does White balance effect an Image?
Quick recap: Different light sources have different color temperatures and our cameras must be told what this temperature is in order to capture the image as we perceive it. The way this is accomplished is by changing the white balance setting. The white balance setting tells your camera the color of the light source illuminating your subject and enables your camera to remove unrealistic color cast (so objects that are white, appear white in a photo).
Lets take a look at how each of the white balance settings effects an image. Below is the same photo with different white balance setting. Clearly, by changing the white balance setting the images' color changes. Some images might look a little weird but that is because the light source of the image does not match the applied white balance setting. (aka the light source for this image is most likely daylight, so when the tungsten white balance setting is applied, the image will have some funky color.
There are three white balance setting not shown above.
- Auto Setting (A) - This setting allows your camera to determine which of the above setting your camera should use.
- White Card (PRE) - This is an advance setting where a photographer uses grey cards to help the camera determine the exact kelvin setting needed for the current lighting situation.
- Kelvin (K) - This is another advanced setting that allows the user to set the exact kelvin. This is different then the PRE setting as no grey cards are used.
White Balance Setting: Tungsten


White Balance Setting: Shade


White Balance Setting: Fluorescent


White Balance Setting: Flash


White Balance Setting: Daylight


White Balance Setting: Cloudy


application of the white balance setting
Outside of manually changing the white balance setting, most modern cameras have an auto white balance setting that will automatically change depending on the light source. This feature works pretty well about 90% of the time. There are a few times when the auto WB feature gets it wrong and will be noticeable when viewing your photo on a large screen. However, if you are shooting in RAW format, you are able to easily change the white balance in a post processing software like Adobe Lightroom. If the image was shot in a JPEG or other photo format, the white balance setting the camera was on when the image was taken, is locked in and can't be changed. This is one of the major benefits to shooting images in the RAW format.
There are also specific image types that require the white balance setting to be manually adjusted. While photographing a city at night you might notice that there are several different types of street lightning being used. Each of these lighting types requires a different white balance adjustment to get your image the way you want it to look. There is a great article by PetaPixel about setting the white balance for different streetlight types.
How to change White Balance and Where it is located

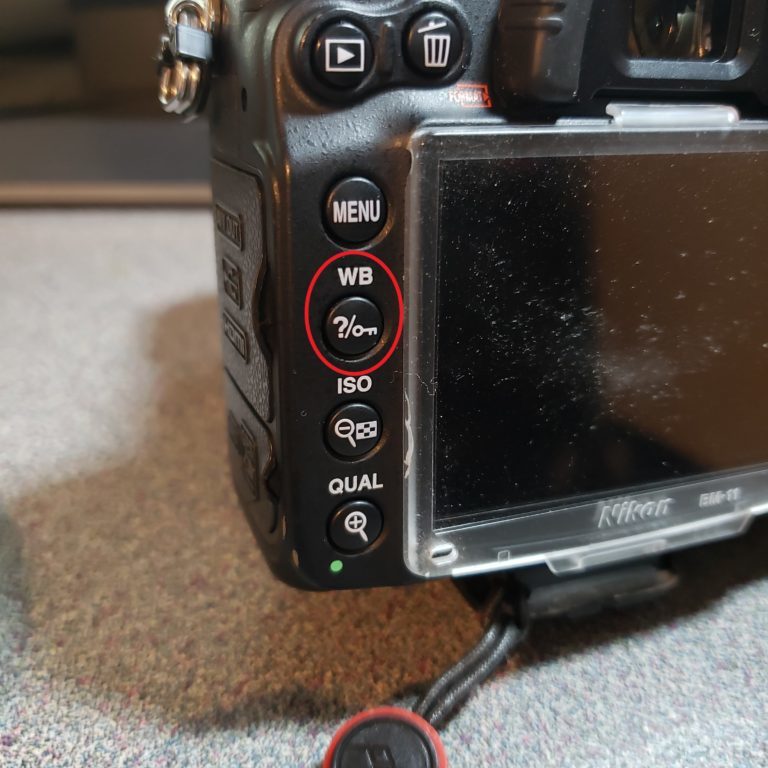
The White Balance setting, denoted as "WB" on most cameras, can be found in both the live view and on the normal camera display, as shown in the below photos. [NOTE: This setting does not get displayed when looking through the view finder no matter what button you press.]
Unlike other settings, the white balance setting it is not always displayed. In order to see which white balance setting is currently set, you must press the "WB" button on the back of your camera (see picture to the left for location and an example of how it is denoted on cameras).
Not only do you have to press the "WB" button to see the setting, you must also keep it depressed to change the setting. To change the setting keep the "WB" button depressed and rotate the back command wheel as displayed in the video near the end of this page.

